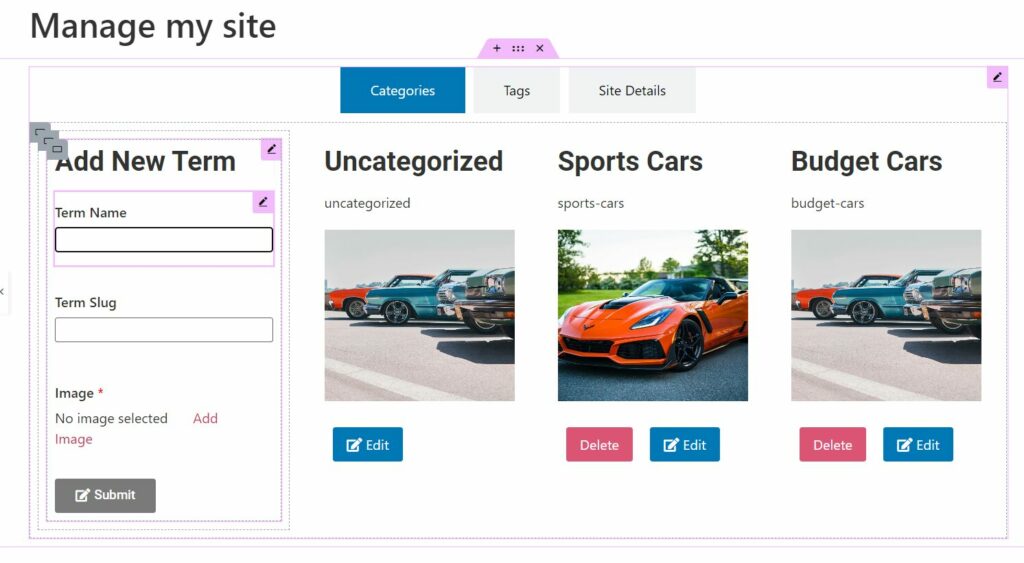
In this tutorial, we will create a frontend management page for categories and tags using Frontend Admin and Elementor Pro. This will allow your users to manage your site’s categories and tags without needing access to the WordPress dashboard.
Overview of the Management Page
On this management page (as seen above), users will be able to:
- Manage Categories: Add, view, edit, and delete categories.
- Manage Tags: Similarly, add, view, edit, and delete tags.
Step 1: Setting Up User Permissions
To ensure that only administrators and editors can access the management page, follow these steps:
- Test Access for Unauthorized Users:
- Open an incognito window and navigate to the “Manage My Site” page. You should be redirected to the homepage, confirming that unauthorized users cannot access this page.
- Log In as an Editor:
- Once logged in as an editor, you will see the “Manage My Site” page.
- Restrict Dashboard Access:
- Log in as an administrator and navigate to the WordPress dashboard.
- Go to Frontend Admin settings and enable the Hide WP Dashboard option. This will restrict access to the dashboard for editors and other roles.
- Save the settings.
- Test Redirect for Unauthorized Users:
- Log out and try to access the “Manage My Site” page again. You should be redirected to the homepage.
Step 2: Configuring Page Access
Next, we’ll configure the visibility of the “Manage My Site” page:
- Edit Page Settings:
- Log back in as an administrator and go to Pages.
- Open the “Manage My Site” page and scroll to the Limit Visibility section.
- Set the visibility to Logged-in Users with roles: Administrators and Editors. This ensures that only these roles can view the page.
- Test the Configuration:
- Log out and attempt to access the “Manage My Site” page. You should be redirected to the homepage, confirming the settings are correctly applied.
Step 3: Building the Management Page
Now, let’s start building the management interface:
- Edit with Elementor:
- Log in as an administrator and click on Edit with Elementor on the “Manage My Site” page.
- Create Tabs:
- Create a tab titled “Categories and Tags and Site Details.”
- Within this tab, add a container with two columns for the form and list of categories.
- Add Category Management Form:
- Search for the Add a Term widget and drag it into the left column.
- Use the Nestable Element option to allow for more customization. Enable nested elements in Elementor options.
- Create a Loop for Categories:
- Add a Loop Grid widget to the right column, set to display post taxonomy.
- Create a new template for the loop items and include:
- Category Title using dynamic tags.
- Term Slug to show the actual slug (make it read-only).
- Image using the ACF field.
- Edit and Delete Buttons configured for administrator and editor visibility.
- Configure the Edit Form:
- Use the Edit Taxonomy form and configure it to include the term name and ACF fields. Set it to show in a modal.
- Style the Layout:
- Adjust margins and styles to center the buttons and ensure images display correctly.
Step 4: Adding and Managing Tags
- Create the Tags Tab:
- Copy the setup from the categories tab and paste it into a new “Tags” tab.
- Change the taxonomy to “Tag” and remove any unnecessary fields like images.
- Update the Loop for Tags:
- Ensure the loop grid in the tags tab is set to display tags.
Step 5: Editing Site Details
- Add Site Details Form:
- Drag the Edit Site Form into the tab. Editors will be able to update site title, tagline, logo, and any relevant ACF fields directly from the front end.
Final Testing
- Testing Functionality:
- Log in as an editor to verify that the “Add New Category” form and the list of categories are visible and functional.
- Log out and ensure that users with lower permissions (like authors) are redirected correctly.
- Customization and Aesthetic Adjustments:
- Adjust styles as needed to match your site’s aesthetic.
Conclusion
Congratulations! You have successfully built a front-end management page for categories and tags. This setup enables your users to become editors from the frontend while keeping the backend dashboard secure.
If you have any questions or want to share your setup, feel free to reachout to Shabti directly at support@dynamiapps.com
𝐏𝐥𝐮𝐠𝐢𝐧𝐬 𝐮𝐬𝐞𝐝 𝐢𝐧 𝐭𝐡𝐢𝐬 𝐯𝐢𝐝𝐞𝐨:
Elementor Pro (affiliate link): https://be.elementor.com/visit/?bta=5626&brand=elementor
Frontend Admin Pro: https://www.dynamiapps.com/frontend-admin/#pricing